
If you asked me, I’d tell you that proper tracking is the single most important element in your local business digital marketing stack. I’d also tell you that even if you didn’t ask, apparently.
A decent tracking setup allows you to answer the most important questions about your marketing efforts. What’s working and what isn’t?
Many digital marketing strategies today still focus on traffic. Lots of agencies/developers/marketers will slap an Analytics tracking code on your site and call it a day. For most local businesses, though, traffic isn’t all that meaningful of a metric. And in many cases (e.g. Adwords & Facebook), more traffic just means more spending, without any real relationship to results.
What you really need your tracking setup to tell you is how many leads (AKA conversions) you’re getting, and from where. It also needs to do so quickly and easily, without you having to log into multiple accounts to piece everything together.
If you’re spending money or energy on SEO, Adwords, Facebook, or any other kind of digital traffic stream and you’re not measuring how many leads you get from each source, stop what you’re doing right now and make setting up a solid tracking plan your next priority.
This guide is intended to fill you in on all the basic elements you’ll need to assemble a simple, yet flexible and robust tracking setup.
Google Analytics
Google Analytics is at the center of virtually every good web tracking setup. There are other supplemental ways to collect web analytics (like Heap, Hotjar, Facebook Pixels, etc), but Google Analytics is the free, powerful, and omnipresent tool that virtually every website should use. It will be the foundation of our approach in this guide.
Analytics setup tips
Analytics is super easy to set up. Create (or sign into) a Google account, add your Account and Property (website), and install the tracking code in your website’s template.
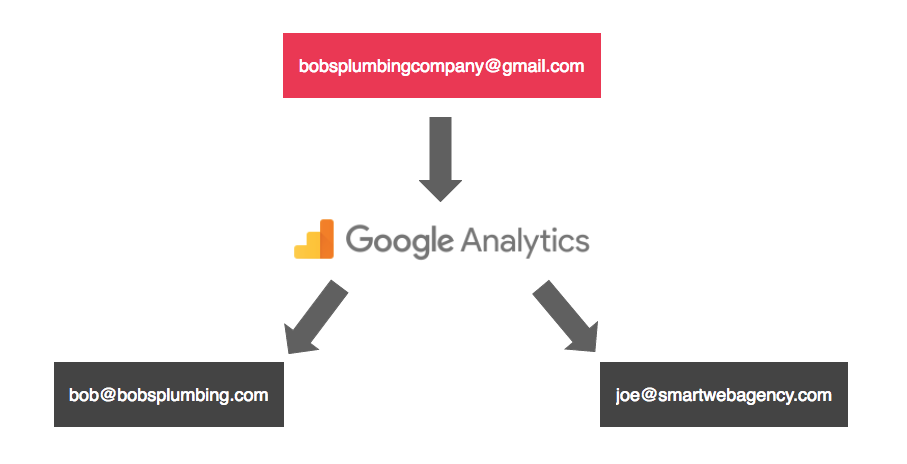
Whatever happens, don’t let your agency or developer set up your Analytics property on their own Account. Agencies and developers: STOP DOING THIS! Create a separate Google/Gmail account and let this be the “owner” of a new Analytics Account, then share permission with the agency/developer’s account, the client’s personal Google account, and so on.
The “All Website Data” view will be created by default for a new property. If you’re going to add filters or make any other advanced changes, be sure to create and use a separate View, keeping the default view clean and pure.
Also be sure to set the appropriate currency and time zone in the “View Settings.” If you ever use Adwords, using the wrong currency setting will result in a major disagreement between Adwords and Analytics.
Once your basic Analytics setup is in place, you should add some goals. This is where the magic happens. Ideally, every business objective your website can achieve should be represented as a goal conversion. Conversions can come in many forms, but here are some of the most common ones:
- Contact form submission
- Quote request form submission
- Phone call
- Text message
- Chat
- Appointment booking
- Newsletter signup
- E-commerce purchase
How you slice up your goals will vary with your needs, but I generally try to group similar “types” of conversions into a single goal. If I have several different contact forms on a site (like a quick contact form in the sidebar, and a heftier one on the contact page), I might group those as a single goal. You can always dig deeper to see the specific breakdown, but it’s nice to keep goals as neat and tidy as possible.
To create a goal in Analytics:
- Navigate to the Admin screen.
- Under the appropriate View, select Goals and then + New Goal.
- You can either choose between a goal Template, or Custom. Most goals are easiest to set up choosing Custom.
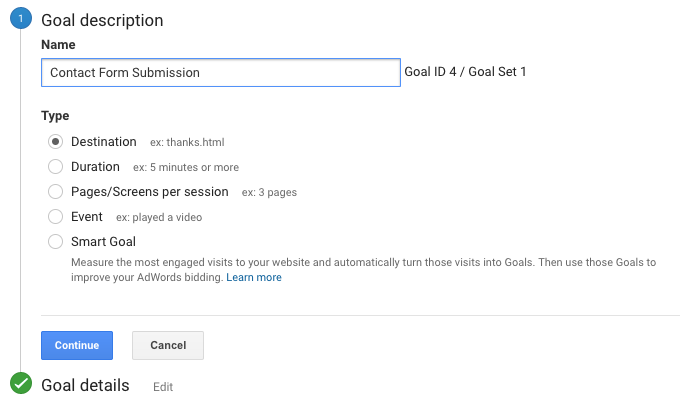
- Give your goal a name (ex. Contact Form Submission) and choose a type. Most goals for local businesses will either be a Destination or an Event.
Pro tip: Analytics allows you to associate a dollar value to your goal conversions. If you can tie your goals to their actual value, it can be a powerful metric to measure performance with. A common way to determine the value of a goal is to take the average value of a sale and multiply it by the average closing rate of Internet leads. For example, if your average sale is worth $1,000, and you typically close 1/10 of leads, your goal value would be $100.
Form tracking
The simplest way to track form fills is to have the form redirect to a “Thank You” page upon submission. This is usually my preferred setup; it’s easy to configure, and I can use the Thank You page to recommend other services, articles, etc. on the site and potentially keep the user around. I also find a dedicated Thank You page to provide the best affirmation that the form submission actually went through.
Different forms can all use the same Thank You page, and pass along variables in the URL to distinguish themselves from each other so you don’t have to create a hundred different Thank You pages to track different forms or goals. Most decent form plugins for WordPress are capable of this. My favorite is Gravityforms. Contact Form 7 and Ninja Forms are also very popular (and free).
Another option is using event tracking. Event tracking allows you to track the click of a button or link (the submit button, in the case of a web form). This would circumvent the need for a thank you page if you don’t want to (or can’t) send the user elsewhere when they submit a form. It’s also handy for other, more advanced forms of tracking.
Here’s a handy plugin for Gravityforms that makes setting up event tracking a snap.
Once you’ve got your form redirecting to a Thank You page or generating an event, you just need to create a goal in Analytics with the corresponding value.
You can use Thank You pages or events in a similar manner to track appointment booking, web chats, newsletter signups, etc.
Many businesses and marketers have adopted form tracking, since it’s easy and free. That’s great. But for most businesses, it leaves a huge volume of web conversions untracked.
If you’re spending cash to generate traffic to your site, you could be hemorrhaging budget if you’re not collecting and attributing the phone call conversions from your website.
There are several solutions and approaches to call tracking. I use and recommend CallRail, which also seems to have emerged as the darling of the digital marketing community over the past few years thanks to its ease of use, great support, fair pricing, and focus on integration. Another option (so I don’t come across as completely biased) is CallTrackingMetrics.
You’ll want to make sure your call tracking platform allows for integration with Google Analytics and offers something called “dynamic number insertion.”
Dynamic number insertion uses JavaScript to detect your actual local phone number on your website and replace it with a tracking number when a user loads your page.
Dynamic insertion is especially important in the context of local SEO, since it allows you to keep your real, local number on your site, and maintain NAP consistency with the rest of your business’s citations. Assuming it’s implemented properly, Google will still see your real number when it crawls your site, but users will get a tracked number.
Basically, magic.
There are a few ways to implement dynamic number insertion. For most businesses, one of these two approaches should fit the bill.
With this approach, you’ll create a tracking number for each source you wish to track calls for. These sources might be:
- Organic search traffic
- Paid search traffic
- Facebook referral traffic
- Yelp referral traffic
- Direct traffic
- Vanity URL traffic (for visitors coming from an offline TV or radio ad, for example)
When someone arrives at your website from one of these predefined sources, the corresponding number will show in place of your real number, wherever it’s visible. If someone calls that number, an event will be passed to Analytics along with the source.
This approach isn’t perfect, but it’s a solid solution if your site gets large amounts of traffic (5k+ visits/day) and you want to keep call tracking costs low. It will do a solid job of answering the basic questions of how many calls your site generates and where they came from, but it comes with a few minor caveats:
- Calls originating from sources you didn’t predefine will be missed.
- Events sent to Analytics will create artificial sessions not tied to actual user sessions.
- Call conversions coming from Adwords clicks won’t be attached to campaigns, ad groups, or keywords.
Some of these issues have more advanced workarounds. None of them are deal breakers… but you can avoid them completely with number pools — the awesomest call tracking method.
“Keyword Pools,” as CallRail refers to them, are the killer app for call tracking. As long as your traffic doesn’t make this option prohibitively expensive (which won’t be a problem for most local business websites), this is the way to go.
In this approach, you create a pool with several numbers (8+ with CallRail). Each concurrent visitor on your site is assigned a different number, and if they call it, the conversion is attached to their session in Analytics, as well as their click in Adwords (if applicable). No more artificial sessions or disconnected conversions, and as long as you have enough numbers in your pool to cover your site’s traffic, you’ll capture all calls from your site, regardless of source. It’s also much quicker to set up than…